Subscription Audits: How to Find Hidden Recurring Charges
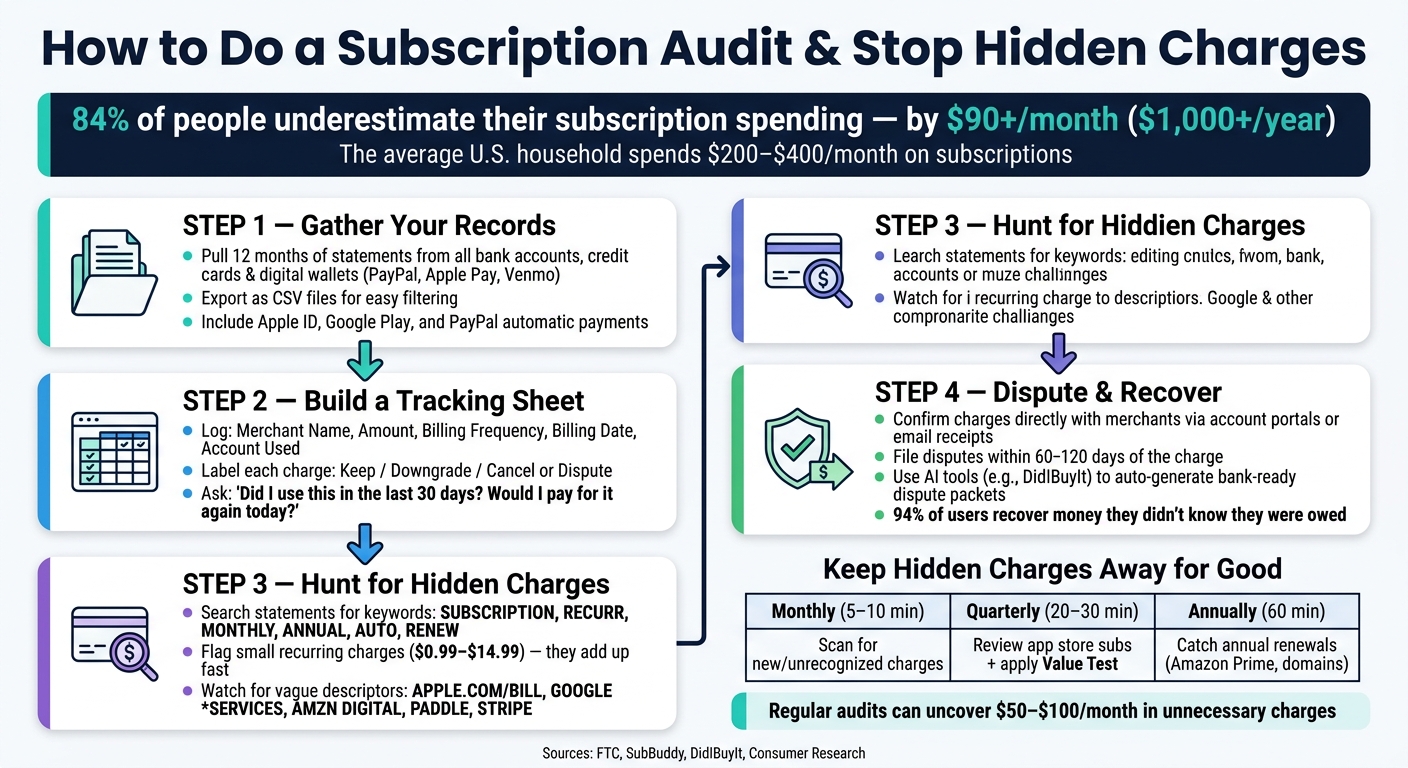
Did you know most people underestimate their subscription spending by over $90 per month? That’s more than $1,000 per year quietly draining from your accounts. Subscription audits help you take back control by identifying recurring charges you no longer need or recognize.
Here’s how to start:
- Review 12 months of transaction history from bank accounts, credit cards, and digital wallets like PayPal or Apple Pay.
- Spot vague billing names (e.g., “APPLE.COM/BILL,” “PADDLE.NET”) and small, recurring charges ($0.99–$14.99).
- Use a tracking sheet to log subscriptions, costs, billing dates, and their status (Keep, Cancel, or Downgrade).
- Leverage AI tools like DidIBuyIt to quickly detect recurring charges, decode confusing billing descriptors, and generate dispute packets for refunds.
How to Do a Subscription Audit: Step-by-Step Guide
Subscription Audit: Find & Cancel Hidden Recurring Charges Draining Your Money
sbb-itb-5d40823
How to Prepare for a Subscription Audit
Before diving into an audit, the first step is to organize all your account and payment records to get a clear view of every recurring charge.
Gather Your Accounts and Payment Records
Start by collecting 12 months of transaction history from all your payment accounts - checking, credit, and debit. Why a full year? Because some charges, like annual renewals (think domain registrations or software licenses), won’t show up in a shorter 30- or 90-day timeframe [1][3].
Don’t stop there. Be sure to include transaction records from digital wallets like PayPal, Venmo, and Cash App. Also, check subscriptions tied to your Apple ID or Google Play account. Keep in mind, these charges often show up under generic labels like PAYPAL * [Merchant], PP-AGREEMT, APPLE.COM/BILL, or GOOGLE *SERVICES, which can make them harder to identify [1][4].
For easier sorting and filtering, export your records as CSV files instead of PDFs. This way, you can quickly search by merchant name or amount to spot recurring charges more efficiently [1].
Once you’ve consolidated your records, the next step is to track your subscriptions in an organized way.
Set Up a Subscription Tracking Sheet
Now that your records are in one place, create a tracking sheet to log all recurring charges. This sheet will help you review subscriptions at a glance and make it easier to document disputes if needed.
Here’s a simple structure to use:
| Column | Purpose |
|---|---|
| Merchant/Service Name | The provider (e.g., Netflix, Adobe, Dropbox) |
| Amount (USD) | Exact cost per billing cycle |
| Billing Frequency | Monthly, quarterly, or annual |
| Billing Date | When the charge usually posts |
| Account Used | The card or wallet being charged |
| Status/Label | Needed (Keep), Optional (Downgrade), or Suspicious (Cancel/Dispute) |
| Notes | Add links, screenshots, or dispute details |
The Status/Label column is key. Use it to evaluate each subscription based on your recent usage. Ask yourself: Have I used this in the last 30 days? Would I willingly pay for it again today? If the answer is no, mark it as Optional or Suspicious. This way, when it’s time to cancel or downgrade, you’ll already have a clear action plan [8][2].
How to Find Hidden Recurring Charges
Once your records are organized, it’s time to dig into the details and uncover those sneaky recurring fees.
Look for Patterns in Your Statements
Start by reviewing your statements with your tracking sheet handy. Pay close attention to small, recurring amounts that might otherwise go unnoticed.
If you’ve exported your statements as CSV files, use the Ctrl+F function to search for terms like SUBSCRIPTION, RECURR, MONTHLY, ANNUAL, AUTO, MEMBERSHIP, or RENEW. These keywords often appear in billing descriptions and can help you pinpoint charges you might have overlooked.
Keep an eye out for amounts that show up consistently each month, especially small charges ranging from $0.99 to $14.99. These low-dollar charges are designed to avoid drawing attention. For instance, a $4.99 cloud storage fee paired with a $14.99 fitness app subscription might not seem like much at first, but together, they can total nearly $500 annually [7]. On average, American households spend between $200 and $400 per month on subscriptions [6].
Misleading labels and automatic trial conversions can make spotting these charges even trickier. Let’s break that down further.
Recognize Common Subscription Traps
Some of the hardest charges to identify are hidden behind vague billing descriptions. For example:
APPLE.COM/BILLcould refer to any number of Apple services, like iCloud or App Store purchases.GOOGLE *SERVICESmight include YouTube Premium, Google One, or other Play Store subscriptions.AMZN DIGITALcould mean Amazon Prime, Audible, or Kindle Unlimited.
"If you see a charge you don't recognize and the amount seems too small to worry about ($2.99, $4.99), that's exactly what subscription services count on. Small charges fly under the radar." – SubBuddy [2]
Free trials are another common trap. Many convert to paid subscriptions automatically, often without a clear reminder. Organizing charges by merchant in your tracking sheet can help you spot patterns, like multiple charges bundled under a single generic descriptor.
Confirm Subscriptions Directly with Merchants
Once you’ve flagged potential charges, go straight to the source to confirm their origins. The table below highlights common billing descriptors and how to verify or cancel subscriptions:
| Statement Descriptor | Likely Service | Where to Confirm |
|---|---|---|
APPLE.COM/BILL |
iCloud, Apple Music, App Store apps | iPhone Settings > Apple ID > Subscriptions |
GOOGLE *SERVICES |
YouTube Premium, Google One, Play Store apps | Google Play > Payments & Subscriptions |
PAYPAL * [Merchant] |
Any service billed via PayPal | PayPal Settings > Payments > Automatic Payments |
AMZN DIGITAL |
Amazon Prime, Kindle Unlimited, Audible | Amazon Account > Memberships & Subscriptions |
PADDLE or STRIPE |
Various SaaS tools | Search the descriptor online or check email receipts |
If you’re still unsure about a charge, try searching your email for terms like "receipt", "renewal", or "invoice" around the date of the transaction. Most services send billing confirmations or renewal notices. After identifying the charge, log in to the merchant's account portal to review your billing history and renewal dates. If you find a subscription you don’t remember signing up for, you may want to dispute it with your bank.
Using AI Tools to Speed Up Subscription Audits
Manual audits can get the job done, but let’s face it - they’re slow and often unreliable, especially when merchants use vague or misleading billing descriptors. AI-powered tools like DidIBuyIt simplify the process by quickly identifying recurring charges and unauthorized fees across your accounts. From spotting suspicious charges to managing disputes, DidIBuyIt makes subscription audits faster and easier.
Automate Charge Detection
Tired of combing through your bank statements line by line? With DidIBuyIt, you can simply paste a billing descriptor into the platform. The AI then cross-references it against a massive database of 50,000+ merchant descriptors, scam patterns, and records to pinpoint the source of the charge. It even flags patterns like multiple transactions from the same scammer using different descriptors, bundling them into a single dispute package for your bank [9].
Take user Tom R., for example. In April 2026, he found three unrecognized charges on his statement. DidIBuyIt revealed that all three came from the same scammer, who used different billing descriptors to mask the transactions. The tool automatically grouped them into one dispute package, saving him time and effort [9].
DidIBuyIt also categorizes each charge - whether it’s fraud, a forgotten subscription, or a billing error - so you know exactly what you’re dealing with before you take action.
Once a suspicious charge is flagged, the next step is knowing what to do about unauthorized charges and preparing the necessary documentation to dispute it with your bank.
Create Bank-Ready Dispute Documents
Spotting a rogue charge is just the beginning. Banks require specific reason codes, supporting evidence, and properly formatted requests to process chargebacks. Preparing all of this manually can take hours.
"That charge shouldn’t be there? Identify it and build a bank-ready dispute in under 5 minutes." – DidIBuyIt [9]
DidIBuyIt takes care of this for you. It generates a complete dispute packet - including transaction details, the correct reason code, an evidence checklist, and a ready-to-file PDF - formatted to meet the standards of major U.S. payment platforms like Visa, Mastercard, Amex, and PayPal [9][10].
Here’s a real-life example: In May 2026, Sarah M. used DidIBuyIt to dispute a $599 charge from Adobe for a subscription she had canceled three months earlier. Adobe refused her refund, but within four minutes, she created a dispute packet using the tool. Her bank reversed the charge in just six days [10].
Track Dispute Status and Recovered Amounts
DidIBuyIt doesn’t stop at detection and dispute creation - it also helps you stay on top of your claims. Once a dispute is filed, you can track its progress, monitor recovered amounts, and ensure you meet follow-up deadlines before the recovery window closes.
Why is this important? You typically have 60–120 days to dispute unauthorized charges. Miss that window, and your money is gone for good [9][10]. DidIBuyIt’s tracking feature ensures you never miss a deadline.
The results speak for themselves: 94% of users recover money they didn’t know they were owed, and the platform helped recover $3.2 million for customers in just one month [10].
How to Avoid Hidden Charges Going Forward
Hidden charges can be frustrating, but with the right strategies, you can avoid them altogether. Here's how:
Build Better Subscription Habits
One of the simplest yet most effective strategies is the "24-Hour Rule": as soon as you start a free trial, set a calendar reminder for 24–48 hours before the trial ends. This quick step can help you avoid unexpected charges when the trial period transitions into a paid subscription [2][7].
Another tip? Use a virtual card with a spending cap for subscriptions. If a merchant tries to charge beyond your set limit or renews a trial without your approval, the charge will automatically fail [1][2]. Alternatively, consider dedicating a specific credit card for all your subscriptions. This way, you can keep track of recurring charges in one place [7].
To ensure you're getting value for your money, try a monthly Value Test. Ask yourself two questions: Did I use this subscription in the past 30 days? Would I still pay for it at full price? Most people pay for around 12 subscriptions but actively use only 7 or 8 of them [3]. Identifying that gap can save you money.
Pair these habits with regular audits to maintain control over your spending.
Run Routine Subscription Audits
A single audit is helpful, but regular reviews are what truly make a difference. Stick to a simple two-tier schedule:
| Audit Frequency | Duration | Focus Area |
|---|---|---|
| Monthly | 5–10 minutes | Scan your statements for any new or unrecognized charges. |
| Quarterly | 20–30 minutes | Review app store subscriptions, email receipts, and apply the Value Test. This is particularly important for identifying an Apple iTunes charge that might be buried in your history. |
| Annually | 60 minutes | Look back at a full year of charges to catch annual renewals like Amazon Prime or domain registrations. |
"A subscription audit is not a one-time cleanup. It is a habit that keeps your fixed costs honest." – Finny [7]
These audits can uncover anywhere from $50 to $100 per month in unnecessary charges [8][3]. Quarterly reviews are especially helpful for spotting app store subscriptions that might have slipped through the cracks [1][7].
By making audits a regular practice, you’ll catch any sneaky changes before they drain your wallet.
Watch for Subscription Changes
Even with solid habits, staying vigilant is key. Merchants often increase rates by small amounts - $1 to $3 - that can quietly add up over time [5]. To stay ahead, search your email inbox each month for terms like "renewal", "price update", "billed", or "trial ending." This can help you spot any changes before they hit your account [2][7].
Be on the lookout for unfamiliar billing descriptors. If you see something you don’t recognize, a quick Google search can help you identify the vendor [1][5].
And remember, under the FTC's "Click to Cancel" rule (effective 2025), companies must make canceling subscriptions as straightforward as signing up. If you encounter unnecessary hurdles, you can file a complaint at ftc.gov [5].
Conclusion
Hidden recurring charges won't vanish without action. As Alex Coca, Founder & CEO of SubBuddy, explains:
"The subscriptions hiding in your bank statement aren't going away on their own. They're counting on your inattention, your busy schedule, your assumption that it's 'just a few dollars.'" [2]
This highlights the importance of tackling these overlooked expenses. The gap between what Americans believe they spend on subscriptions and what they actually spend reveals just how these charges quietly drain finances [5]. The solution? A simple 30–45 minute review of your accounts can make a big difference, and building a routine to check quarterly can help ensure those savings stick.
Start by reviewing your recent bank statements, flagging unfamiliar charges, verifying active subscriptions, and keeping track of cancellations [1]. Tools like DidIBuyIt simplify the process by turning flagged charges into bank-ready dispute packets ready for your bank, saving you the hassle of manual paperwork [11].
With 84% of people underestimating their subscription spending [5], adopting a regular audit habit and leveraging automated tools is a smart way to reclaim control over your finances.
FAQs
What counts as a “hidden” recurring charge?
Recurring charges that fly under the radar can quietly chip away at your finances. These "hidden" fees often come from sources like free trials that automatically renew, annual or quarterly subscriptions, app store purchases, or services that increase their rates without making it obvious. Over time, these small, unnoticed payments can stack up, creating a bigger dent in your account than you might realize.
How can I tell what a vague descriptor like APPLE.COM/BILL is?
A charge labeled APPLE.COM/BILL typically points to a transaction from Apple, often tied to the App Store or a subscription service. To figure out what the charge is for, check your purchase history or review your active subscriptions directly in your App Store account.
When should I dispute a charge vs just cancel the subscription?
Disputing a charge is the right move if it’s unauthorized, incorrect, or tied to a recurring fee you never agreed to. On the other hand, if you knowingly signed up for a subscription but no longer want it, canceling is the better option. Disputing focuses on recovering funds for charges that shouldn’t have been made, while canceling ensures you won’t face future payments for services you’re no longer using.